

Minesweeper as a blueprints exercise
- May 8, 2023
- 20 min read
Updated: May 20, 2023
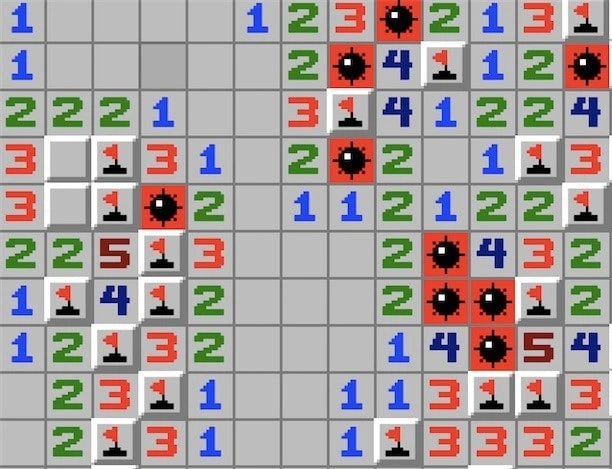
MINESWEEPER
The freebie project file and packaged game for this presentation are linked at the end.
This presentation is like a post-mortem; to keep things lively I’ve added some useful tips and witty jokes (but you may have to search for them).
Wait Tom, this isn’t your usual thing?
Normally I spend my time on AAA BIG EPIC FANTASY type stuff, but I also like these retro-tiny-classic-nostalgia games. I should be making something new and catchy, but I was emotionally hooked on recreating this game for nostalgia reasons. So here we go…
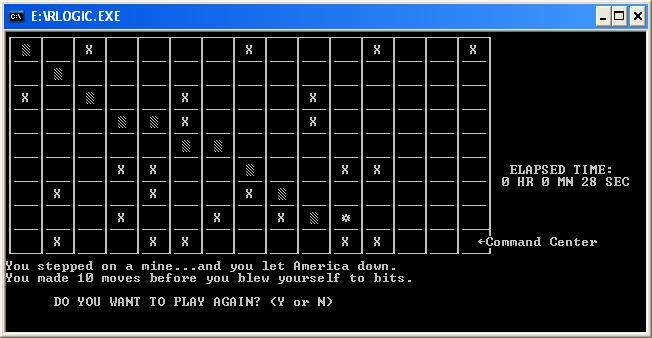
Minesweeper (originally by Curt Johnson) is a classic game. If it isn’t neuronally stamped on your consciousness already, it will be if you try to make it in unreal blueprints, for sure. Most people know the game, but you may not know that it was itself inspired by earlier games based on grid clearing, such as Relentless Logic.
The steps for this implementation involve the following features:
Randomly generating mines on the game board.
Implementing a game over condition if a mine is clicked.
Implementing a game win condition if the player clears the empty grid spots without hitting any mines.
The ability to flag potential mines.
Adding images or animations to the base graphics, and sounds.
Adding a timer and a score system based on the time taken to complete the game.
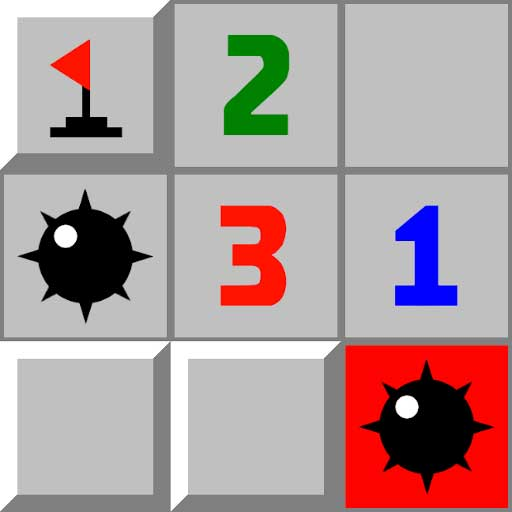
I’m going to guess that you know how Minesweeper plays. If not, you can enjoy it in a browser at Minesweeper Online. If you are here, I suppose you may be wondering how Minesweeper can be created. The game presents a grid with hidden mines, requiring players to reveal non-mined tiles, boldly or cautiously. It records the time taken and ranks top 10 times upon completion. Versions include game review, difficulty levels, grid styling, and advanced metrics in online variants. If you lose a game, there’s a detonation sound, the grid is exposed, and you have to quit or start over. So, just a few hours of work to set up?
Mindset
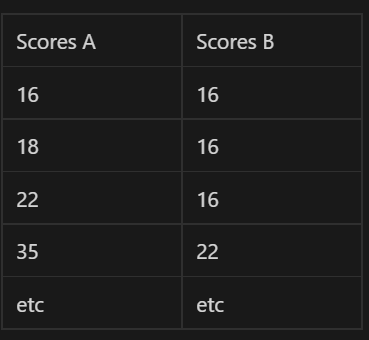
You have to be bitten by some urge to explore the problem, and you have to think about it as an assembly of parts that you can identify and checklist through. Be detail oriented. As problems arise, give them the attention needed to resolve them. Everything tends to require closer examination: Just now I mentioned the scoring system inserts the winner’s score if it’s better than others in the top ten. But what if it’s the same as others in the top ten?
Below are two examples (A and B). If we scored 16, would we add it to Scores A, offsetting the others scores? Or not add it, since it’s already there. In Scores B, would we add the current score at the top or at the bottom? In my implementation, the times are what matters, not who scored them, so they never appear twice (if you score 16, and it’s already in the high scores list), shrug and try again.
Why Unreal?
From my point of view, I’ve been into Unreal since it came out for free as UDK. The online knowledge base is extremely useful. I’ve seen cases where people make a game in multiple engines (or languages) and announce it on youtube, but I don’t have free time for that.
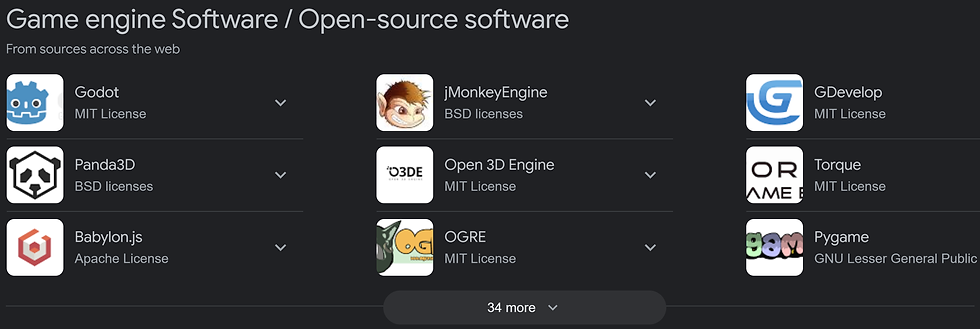
It’s a fair point that, if I was starting out now, literally from scratch, I’d probably orient towards an open source editor like Godot or O3DE, but you have to pick an editor that isn’t too niche or it might end up as abandonware or have stale support/community/etc. Naturally, some people love niche engines. For example, https://flaxengine.com/ looks very cool and is totally free.
Do it in Blueprints
Suffice to say, I really like Blueprints…
A reason to try making Minesweeper solely in Blueprints is that it is a small game to implement, so you can test it rapidly. Like a painter making an observation study of a teapot on a flowery lace cloth, it teaches us to examine the nature of the elements involved. Because Minesweeper has standardised rules, you can validate that the game is properly setup. In my case, the core gameloop is there, but some minor cosmetics I’ve seen in other versions aren’t (like clicking an already clicked tile doesn’t flash nearby valid tiles to click — when I play I don’t use that feature, so I skipped it, even though it’s a cool feature). Minesweeper has minimal art requirements, so you can get it working fairly quickly, without worrying about how it looks. Of course, you can find existing implementations of Minesweeper all over the place in various programming languages. To create it with visual scripting, in Unreal Blueprints, is a sort of more hobby-craft kind of endeavour; in a world where computers can tell you more and more what you need to know, it’s good to try and figure out something from scratch. For some features, I had no idea how I’d go about getting it to work, which is why I was tempted to try it out. Perhaps I’m a sucker for punishment.
In my implementation, since I am really not a programmer, I fluffed around with ideas on transacting the grid array until I managed to get it to work (after many attempts). And I learned a lot along the way. It was satisfying to complete, but the abyss of uncertainty about it was real deep. “We don’t do these things because they are easy but because we thought they would be easy.”
What you’ll need
The graphical elements for Minesweeper can be obtained under a GNU license from wikimedia, i.e:(https://commons.wikimedia.org/wiki/File:Minesweeper_1.svg); or you can make your own as there’s only a few symbols and numbers 1-8 needed.
The symbols are RegularMine (shown at end of game); ExplodedMine (when you click on one); a QuestionMark, a Flag marker, and a Smiley face (it’s not part of the grid but is classically a button on the top of the viewport). The styling of the Smiley face varies a lot, but usually if you fail, the Smiley face takes the hit.

Programmer art images for the Smiley face… one of my colleagues described it as ‘horrific’.
You can obtain the Minesweeper font for free online from FontStruct.com. The font has a Creative Commons license, and to use it in Unreal, you can just drag the downloaded TTF into the Content Browser and it will prompt to install it in the project. It doesn’t hurt to RMB on it in Explorer and install it as a Windows font, but this project doesn’t require that.
Minesweeper can be entirely created in a UI, without any world or level or lighting or visual effects. In many ways, Unreal isn’t the best environment in which to create so simple a game, as the final packaged game will mostly contain the overhead of the editor’s default runtime. The game itself is like a footnote.
You can setup this project using vanilla unreal. It doesn’t use any extra plugins or require code.
In my case, I wanted to make Minesweeper without any plugins. If you’re fond of updating Unreal each version, but don’t like waiting for third party plugins to be updated, having your project work with a vanilla install of the editor is great. It also means you can share the project around easier.
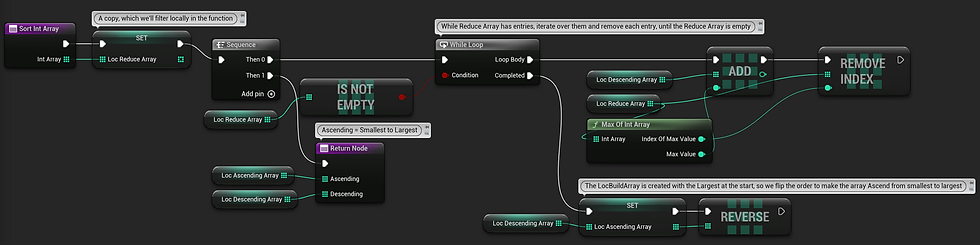
For a while I used the free Rama Victory plugins set (Github : https://github.com/EverNewJoy/VictoryPlugin). This plugin includes a Sort Int Array function, but I realised it was the only function from the set I needed for the Minesweeper game, so I decided to create this function in BP myself.
The function is shown below. Like all the examples in this document, you can find the paste-able version on blueprintue.com via the link in the caption.
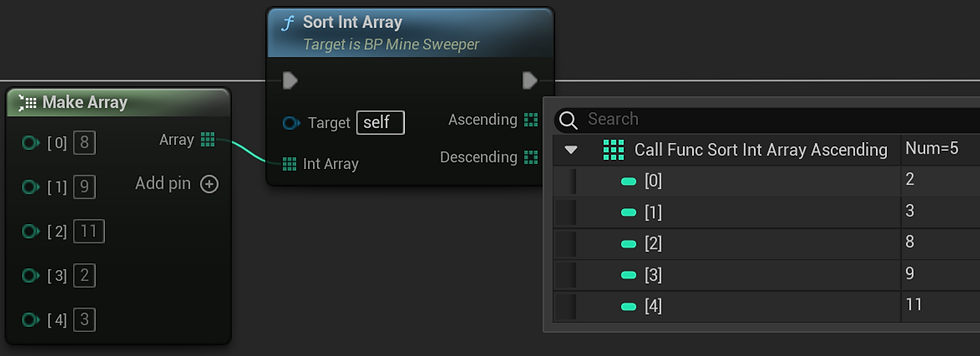
A bunch of numbers to test the function, showing the Integer Array input and the Ascending Array output.
ChatGPT4 can readily output a similar example in C++ for a Blueprint Function Library, so that’s also worth a look. But if you know C++ enough to try Visual Studio, you probably don’t need a guide to set up Minesweeper, so I’ll assume this is for a BP friendly audience.
For sounds, I used WAVs that come in the Engine content, and one or two click and beep WAVs I looked up in royalty free libraries online. Sounds are good to add once you are comfortable with the workings of the gameplay; they add a lot of psychological impact, so try to incorporate them wherever they make sense for providing feedback to the player (and developer).
Project Basics
I’ll assume you have at least started a new project in Unreal before; if not, jump to Epic Games’ youtube channel for unreal or their official training material. In this project, you only have to get used to adding new assets and navigating the graph editor.
The game relies on an actor blueprint called BP_Minesweeper. This is where all the game logic goes.
Technically you could add the logic in your UI widget for this game, or in the player controller.
There are about twenty functions and a large number of variables in the BP_Minesweeper actor. I like to keep the Player Controller BP free for for handling user input (mouse and keystroke events) and savegame handling, and I like to limit the UI to its own widget events (button presses and hover events).
At some point you may want to merge projects, and if the player controller is lightweight, it is easier to merge with another project’s controller. Optimally, doing it all in the UI widget might be better, but I started off with an actor BP and using only a widget didn’t occur to me until I was done.

This is the ‘blueprints’ asset collection for the project, along with some assets for font, sounds, textures (just a few).
For the BP_Minesweeper actor, it’s level independent, so we want to Spawn it in game at 0,0,0 when the game begins and make sure the player controller and actor know about each other by assigning object variables.
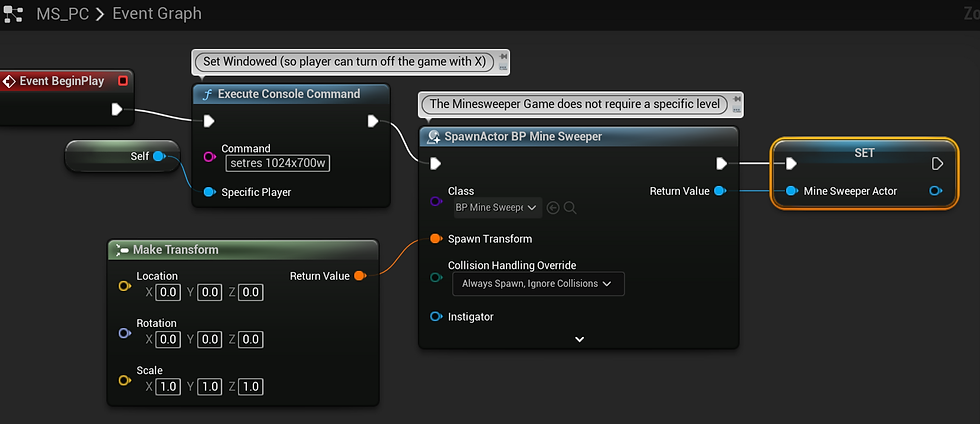
In the above image, the Console Command : setres=1024x700w is executed to ensure the game runs in a windowed mode, so you can quit using the X button in the top of the window. This is optional. You could run the game full screen, but then you have to add a Quit button to the UI. For a game like this, it’s good UX to always show the way to stop the game and close it down.
A different way to set Windowed Mode is to do so in the /Minesweeper/Config/DefaultEngine.ini, as shown below:
Navigate to your project's "Config" folder. You can find it in your project directory: <YourProject>/Config.
Open the "DefaultEngine.ini" file with a text editor.
Add the following lines under the [SystemSettings] section or create the section if it doesn't exist:
[SystemSettings]
r.setres=WidthxHeightw
Replace Width and Height with the desired dimensions for the windowed mode. For example, for a 1280x720 window, use r.setres=1280x720w. The ‘w’ at the end of the line makes it use windowed mode.
Concepts
In Unreal UMG (the UI widget editor), there’s a type of widget called a Uniform Grid, that you can add elements to using a (Row index) (Column index) pair. Let’s call each child of the grid a ‘Tile’. If you create a ‘Tile’ widget, you can fill the uniform grid with it repeatedly. That’s the basis for the game’s minefield.
Part of the fun of setting up Minesweeper is to dynamically create and manage this grid, given the player can change the game’s difficulty by making the grid bigger or smaller, and the bombs are randomly distributed through the grid, differently each new game.
Difficulty
There are three difficulty levels for Minesweeper: Beginner, Intermediate, and Expert. There’s also Custom, (but I didn’t add it, because I never really played that mode myself).
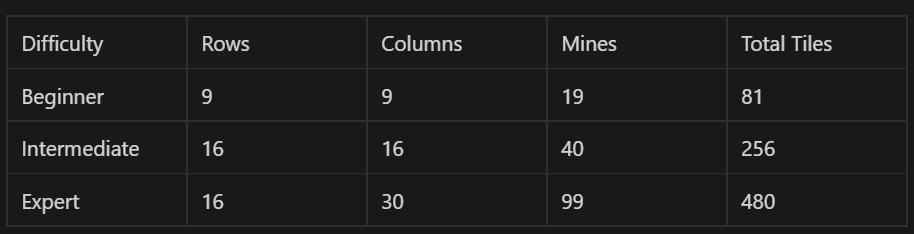
Beginner has a total of ten mines and the board size is either 8 × 8, 9 × 9, or 10 × 10. Intermediate has 40 mines and also varies in size between 13 × 15 and 16 × 16. Finally, expert has 99 mines and is always 16 × 30 (or 30 × 16). [citation: Harvard University: https://dash.harvard.edu/bitstream/handle/1/14398552/BECERRA-SENIORTHESIS-2015.pdf). Please do follow that PDF link and enjoy seeing how seriously they take Minesweeper at Harvard.
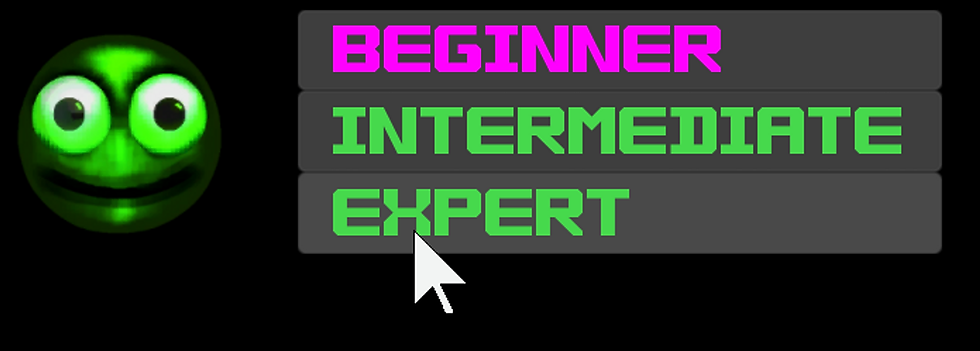
In this version, I used only 3 difficulty presets. The reason I went with three was because when you RMB on the ‘smiley face’ icon, it shows a roll-out of Difficulty Level buttons — graphically it fit three nicely. It didn’t seem necessary to add more before the game was even up and running.
In this implementation, the player is never told about the RMB > Difficulty Settings roll-out. In my opinion, that’s a UX shortcoming. It’s not good to have secret menus.
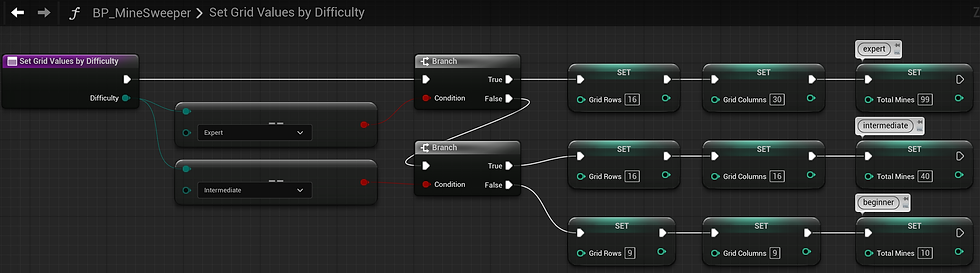
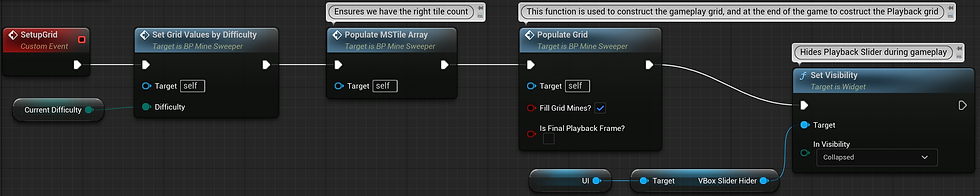
The grid is dynamic, and is built according to difficulty level, obtained during the Start New Game function (Set Grid Values by Difficulty). If the user changes the difficulty level in the UI, a new game begins.
Debug Inputs
For most games, you want to add ways to test features without having to play the entire game. In minesweeper, a cheat shortcut key to show the mines on the grid saves some time (but you’d want to disable it for shipping). When the game is over (on a fail), the mines’ distribution is revealed anyway, so a shortcut to toggle this is easy to add to the function used at the end. Also, a log of how many tiles were cleared per click, the XY of the last clicked tile, that sort of thing, can help to stop you going crazy.
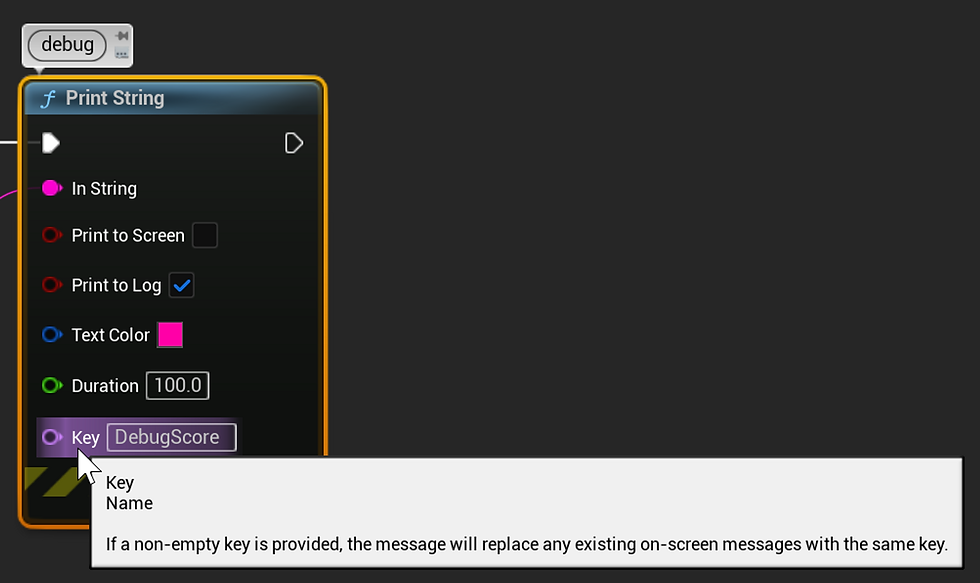
Notice that the Print String node can take a Key term, that you can put on other Print String nodes and if any of them changes, it will replace the current displayed string with the same key. This is great if you want to swap between Enumerations like ‘Cleared’ ‘Uncleared’ ‘Marked’ ‘Queried’ for a minesweeper tile, or update a running time log without flooding the screen with values.
Create your own Blueprint Function Library
Skip to the next section (Grids) if you want to remain a BP purist. For debugging, you may want some functions to only run if you are In Development Mode. I know I said this is a no code tutorial, but this is very optional, and is useful for all your unreal BP projects — if you are curious, you can add your own function to check if the game context is PIE as follows:

Press Tools > New C++ Class …
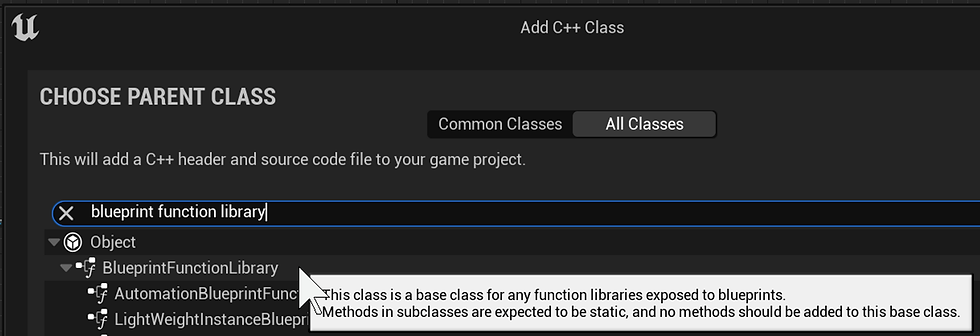
Select a Blueprint Function Library class in the C++ parent class picker in Unreal, call it MyFunctionLibrary. Of course, you can call it whatever you like, but then you’ll need to some name replacing in the code provided. Note the letter U in front of the name is how unreal likes to let C++ know that Unreal is being used for function and variable names.
In the created class in Visual Studio 2019, add a bool IsInPIEWorldContext, as follows:
MyFunctionLibary.h
#pragma once

#include "CoreMinimal.h"
#include "Kismet/BlueprintFunctionLibrary.h"
#include "MyFunctionLibrary.generated.h"

//Replace MYPROJECT_API below with what your project is called, ie FUNPROJECT_API

UCLASS()
class MYPROJECT_API UMyFunctionLibrary : public UBlueprintFunctionLibrary
{
GENERATED_BODY()

public:
UFUNCTION(BlueprintPure, Category = "Debugging", meta = (DisplayName = "Check game is PIE", ToolTip = "This function can be used in Blueprints to check if the game is running in a PIE world context and returns a bool value."))
static bool IsInPIEWorldContext(UObject* WorldContextObject);
};
MyFunctionLibrary.cpp
#include "MyFunctionLibrary.h"
#include "Engine/World.h"

bool UMyFunctionLibrary::IsInPIEWorldContext(UObject* WorldContextObject)
{
UWorld* World = WorldContextObject ? WorldContextObject->GetWorld() : nullptr;
return World && World->IsPlayInEditor();
}
Press Ctrl Shift B to build the solution, and hope it succeeds. If so, save and try the node in the editor. If Visual Studio doesn’t succeed, look at the Output errors. Luckily this is an optional step. You can always remove the .h and .cpp and/or ask for help.
The result Check game is PIE on the node is from the meta argument in the function declaration.
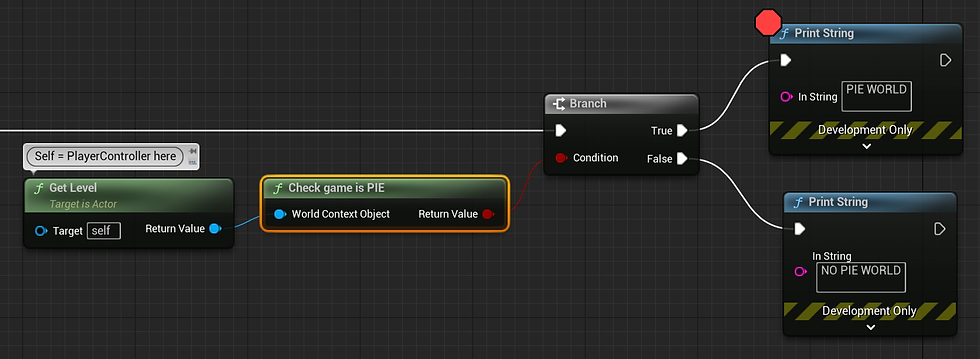
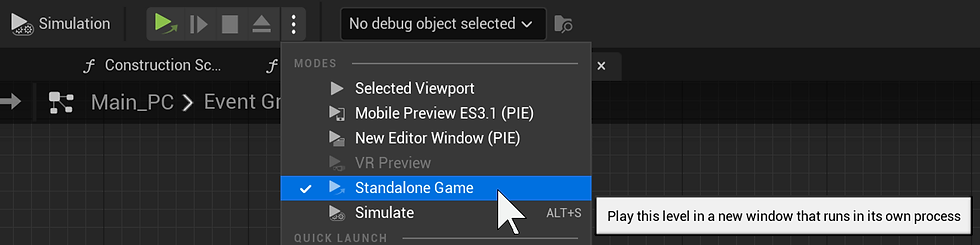
You can compare the difference by using a Print String node for true and false, as shown above, and then running the game in Selected Viewport vs Standalone Game (or Packaged Game).
Let’s get back to the actual Minesweeper stuff…
Grids
Grid mathematics is a useful area to study if you like game development. To get started, take a look at Djikstra’s algorithm (for giving the shortest path in a grid of obstacles): shorturl.at/jkAEI.
The most complicated math Minesweeper uses is to recursively calculate adjacency to determine what surrounding tiles are empty or contain a mine. You can probably figure out the basis for this in your head by thinking on this Table:
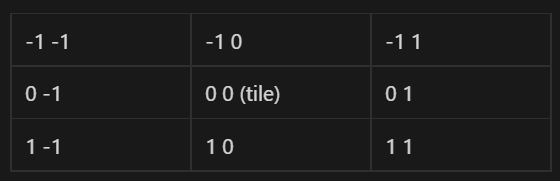
Each tile’s adjacency is a row/column offset one space from x0 y0. Let’s called this a 3x3 Adjacency Table.
As an aside, this is how the adjacency, or surrounding tiles, could be determined in Verse (Epic Games’ new programming language showcased in 2023 GDC) :
for:
		Y->CellRow:Cells
		X->Cell:CellRow
		AdjacentX:=X-1..X+1
		AdjacentY:=Y-1..Y+1
		AdjacentCell := Cells[AdjacentY][AdjacentX]
		Cell<>AdjacentCell
		AdjacentCell.Mined?
do:
		set Cell.AdjacentMines += 1
Epic Games Verse language, Youtube presentation: https://www.youtube.com/watch?v=5prkKOIilJg
Recursion
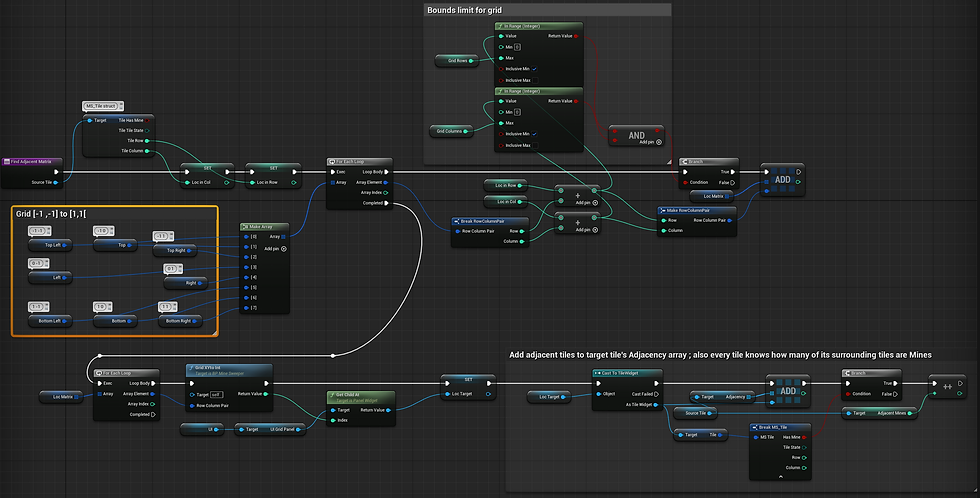
Since it’s possible to click on a grid tile where the tile is clear and so are all the surrounding tiles, the game has to also calculate the adjacency of the cleared surrounding tiles, which can repeat until tiles are cleared quite some distance away from where you clicked. The function we make to test and clear surrounding tiles can run again and again (recursively) until the possibilities are exhausted, but it’s fairly easy to make an infinite loop with a recursive function that calls itself repeatedly. Luckily, Unreal has some knowledge of when the game (at runtime) is stuck in an infinite loop, but it’s still annoying to recover from and necessary to avoid. It’s important to test your game on various machines, as a flaw (like an infinite loop) may only be exposed on a slower or faster machine. Same goes for input device events and screen sizes. It’s a minefield out there.
In the image below, one of the main functions of the Minesweeper game is shown, which checks the surrounding tiles for each revealed empty tile (until none are left to reveal). The image is small, but the point to note is that it calls itself at the end, and re-runs until it cannot. The risky part of this is creating an infinite loop (which I did a lot, until it worked)… that’s recursions, right there.

2D and 1D dimensions
You can convert 2D grid (x, y) coordinates to a 1D array index and vice versa. Let’s say you have a bunch of tiles and they’re distributed in a grid. It’s possible to take a Row/Column pair of values and figure out what index that’d equate to in an array. For example, 0,0 is index 0. And 16x30 is index 480.
The formula for this is “index = y * width + x”, and you can create a BP macro or function that calculates it.
To go the other way, we use two steps.
x = index % width; y = index / width;
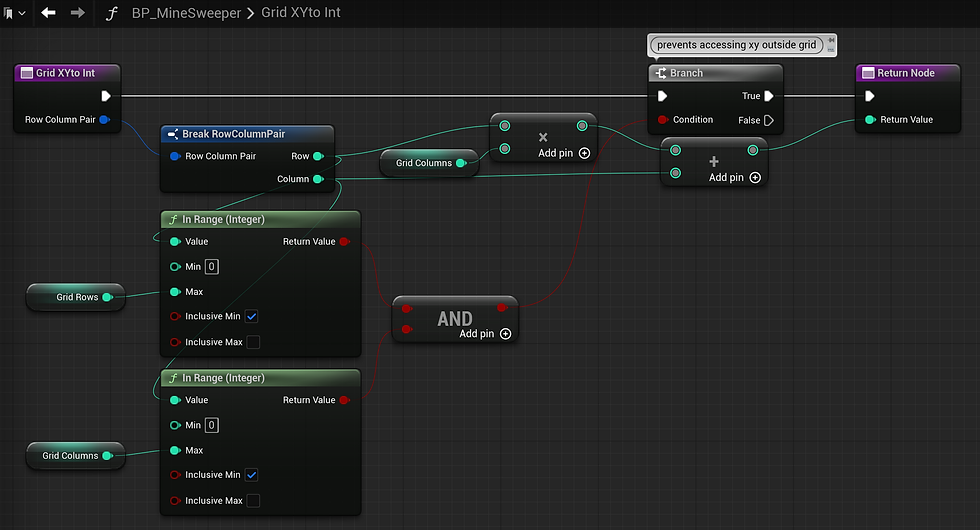
Borders or Bounds
With the 3x3 adjacency table, it works great for grid tiles in the middle of the grid, but the corners or sides of the grid, you have to make sure you don’t sample some kind of off-grid values or invalid space. To do that, when we get to the functions that poll the grid, we have to remember to include some border controls. For the Tiles array of what’s been cleared or mined or flagged to fill the grid properly, and for it to iterate correctly, we want to be sure we’re always stepping through the Uniform Grid widget rows and columns in agreement with our 1D array of Tiles.
Sound Concurrency
One concept that it’s good to know is sound concurrency. You’ll run into this from time to time in games where a lot of running sounds all fire it once or stack up (kicking in before the already playing sounds are finished). This can create volume spikes and weird sounds artefacts. So, Unreal provides an asset called a Sound Concurrency asset that is basically a preset rule-based filterer that limits how a given WAV called in blueprints will respond if there’s a matching one already playing. When you add a Play Sound node in blueprints, note there’s an input field for the Concurrency asset to use, and you just have to take a moment to create one and you’re good to go.
Flashing Text
This is a relatively basic feature, but the benefit is when you want people to look at something, if it’s flashing, that’ll strongly pull their attention. If you have a highscore added to a list of ten numbers, it won’t stand out if it looks like all the others. Flashing it solves this. Or if you have a single ‘clicked’ mine exposed in a field of simultaneously exposed non-clicked mines, driving the player’s attention to the unique one is important. It’s also cool when a flashing visual is paired up with repeating beeps, like a bomb is about to go off.
One Struct to Rule Them All
We’ve mentioned that the whole game could be done in a single UI, and that we’re filling a grid widget with a repeating Tile widget array. How does each Tile know what state it is in, or how to handle being clicked, or whether it contains a bomb or not? For this, we can create a Struct asset that handles all of the above.
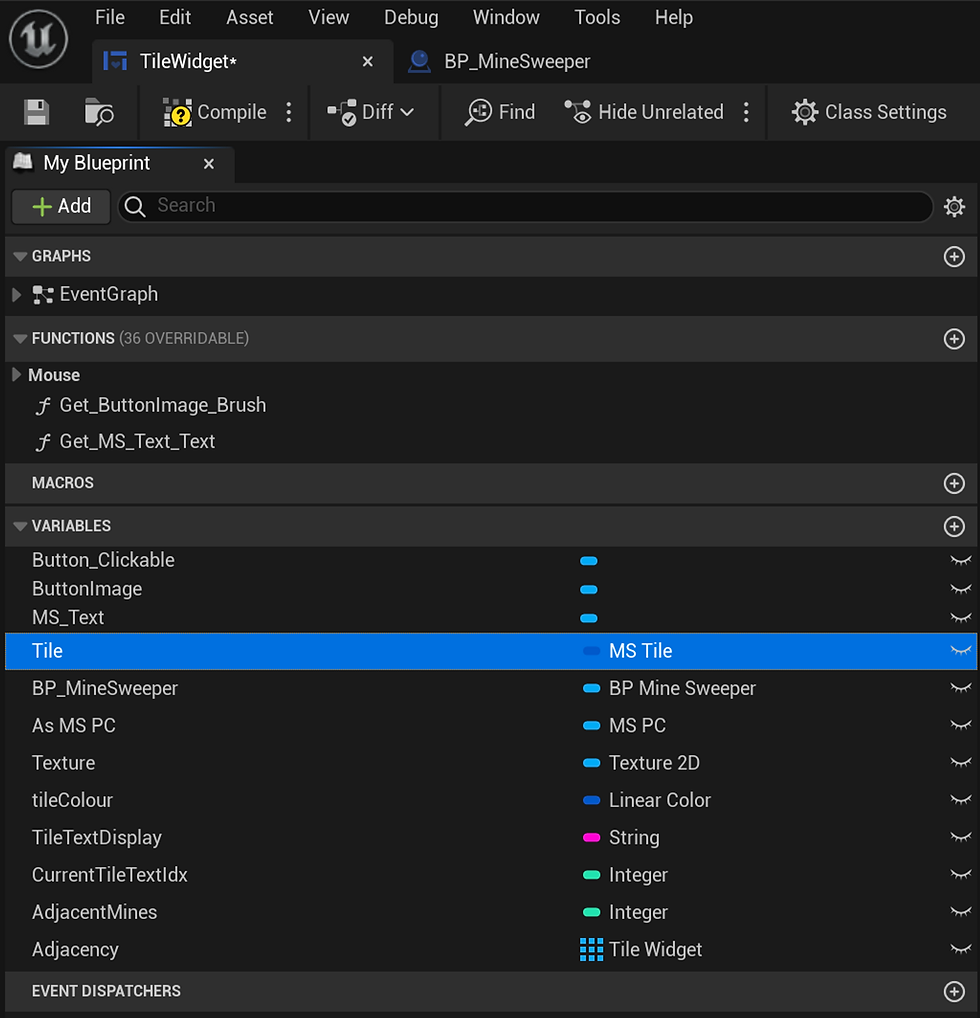
This image shows the variables used by the Tile widget. In terms of UI, most of the variables are for colours and text elements, but a couple are for data, such as AdjacentMines (integer).
Below, we see that the Tile widget is a variable, and it contains a struct (also called Tile, though I’ve made life a little easier and called it ‘MS_Tile’, short for 'Minesweeper_Tile'. Anyway, there are a few ways to represent this:

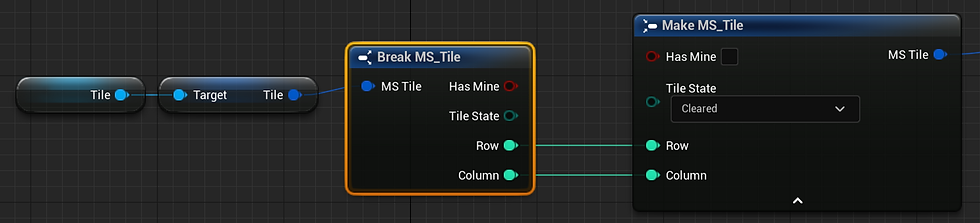
The two images show the same thing. The upper image is a Tile struct pin that has been ‘split’ and the lower image is where the Tile struct has been ‘broken’. These are just different ways to show in the graph the variables that the struct contains. I think the split pin method was added more recently. The advantage to using split pin on the struct is it uses less space than breaking the struct (you can do these for vectors and transforms also). The disadvantage is the split pin doesn’t label itself, so it’s a little harder to quickly discern what struct it is. You can get around that by adding a node comment using Toggle Comment Bubble (hover the node).
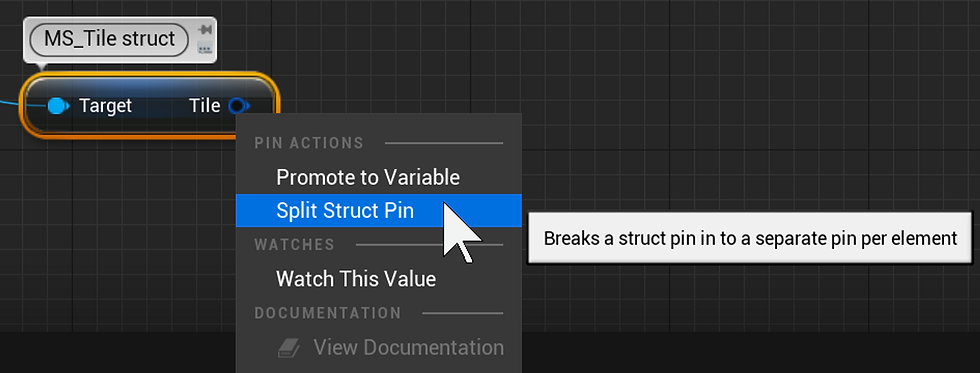
RMB on the Tile variable node ‘s output pin to find the Split Struct Pin option.
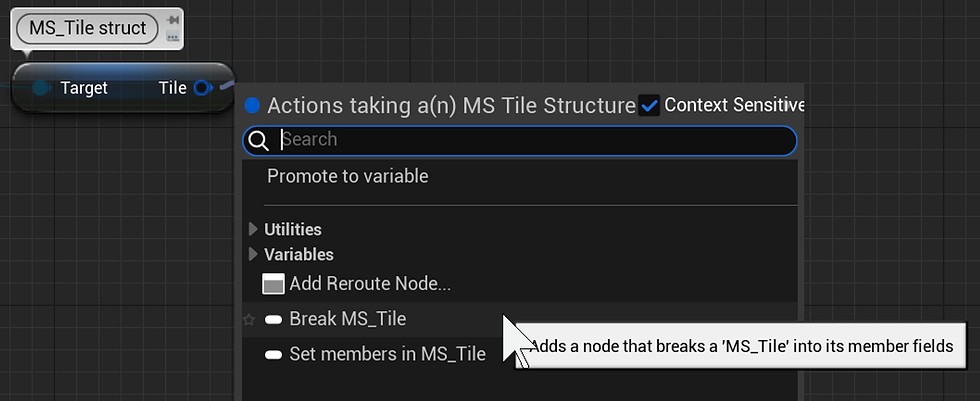
Drag off the Tile output pin to find the Break… option.
We can use the Enumerator ‘TileState’ to check what a clicked tile’s current state is.
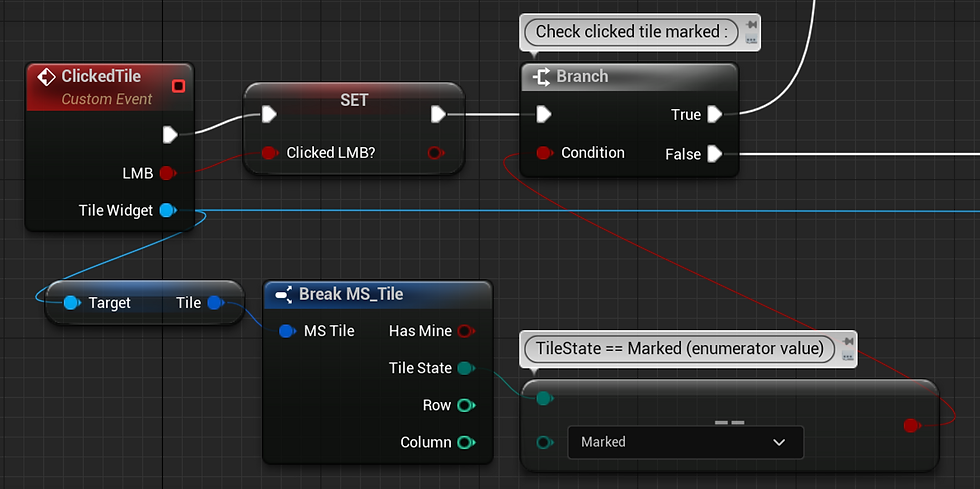
The Tile struct (dark blue) is a variable that was added to the Tile widget (light blue).
The MS_Tile struct is the asset that defines the struct variable Tile in the widget. The asset was created in the Content Browser.
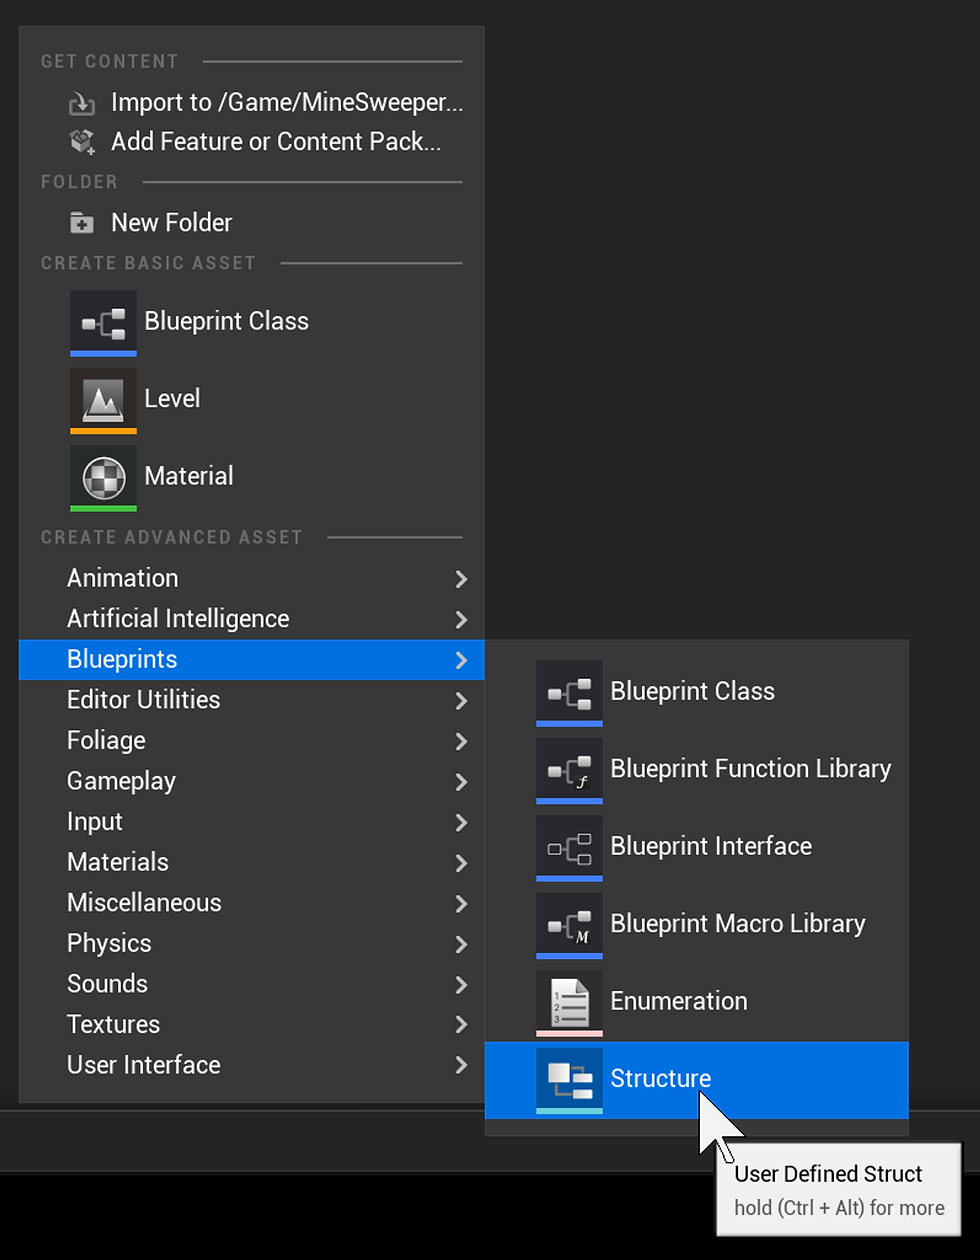
This is how to create a Structure in the editor. Note that just above in the roll-down is an Enumeration. The struct should include an Enumerator called “TileState” that contains entries: “Default, Cleared, Marked, Queried”.
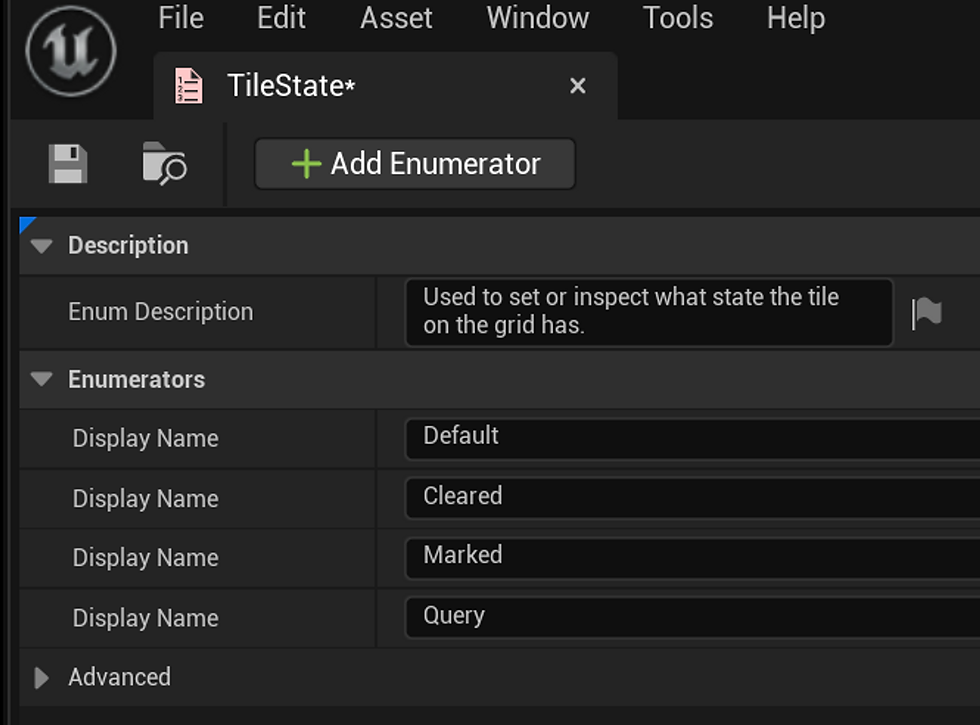
Very important! Observe that MS_Tile struct asset uses a Tile State variable (dark green) based on an enumerator asset. This means you have to create the assets in the correct order.
Alternatively, you can also create these in a C++ class (such as the function library mentioned above), or a new Minesweeper actor (or widget) class. This is a good thing to do if you already have some C++ and you’re going to use really large enumerations or structs. For the Minesweeper case, what we need is rather small, so creating them as BP assets is no trouble.
TileState enumerator…
//Enumerator for the state the tile is currently in, such as cleared or marked.

UENUM(BlueprintType)
enum class EMS_TileStateEnum : uint8
{
Cleared UMETA(DisplayName = "Cleared"),
Default UMETA(DisplayName = "Default"),
Marked UMETA(DisplayName = "Marked"),
Queried UMETA(DisplayName = "Queried")
};
MS_Tile struct…
//This is a struct MS_Tile that contains the variables each Tile widget calls on.

USTRUCT(BlueprintType)
struct FMS_Tile
{
    GENERATED_BODY()

    UPROPERTY(EditAnywhere, BlueprintReadWrite, Category = "Tile")
    bool IsMined;

    UPROPERTY(EditAnywhere, BlueprintReadWrite, Category = "Tile")
    EMS_TileStateEnum TileState;

    UPROPERTY(EditAnywhere, BlueprintReadWrite, Category = "Tile")
    int32 Row;

    UPROPERTY(EditAnywhere, BlueprintReadWrite, Category = "Tile")
    int32 Column;
};
MS_Tile.cpp is not needed as the struct definition in the header file is sufficient.
Note that the IsMined? variable in the MS_Tile struct is a bool type, and not part of the enumerator which sets the Tile state.
This is because, in minesweeper, the tile can be both mined and default, or mined and marked.
The same struct used for tiles in play is used for playback of the game when you click a mine, and scrub a slider to show the history of your session.
Scrubbing the Playback Slider
I don't know if this feature was in the original game, but I saw it on MinesweeperOnline and wondered how hard it would be to add. It's easy to add, but in my version, not super optimal. Because it's more or less an appendix to the game, I didn't revise it (yet).
You may note in the video that the scrub steps aren’t always 1:1 with the game steps (sometimes the slider moves and the game frame doesn’t change). This is probably a float value truncating fault by me, but it’s not critical to fix, so I didn’t look into it (yet). To the degree it bugs me I probably will. Anyway, on a value change in the slider, we get an array of TileStruct values and repopulate the grid. The array was incremented every move of the game, so it’s like a history we can summon up. In Expert mode, which has 480 tiles, redrawing the grid every slider drag is notably slower to update. At the time I added the History slider, I had other commitments, so I was content that it at least works. The special sauce that I did add was the flashing of the final mine that actually detonated, alongside the exposed minefield, so you know what the final move was.
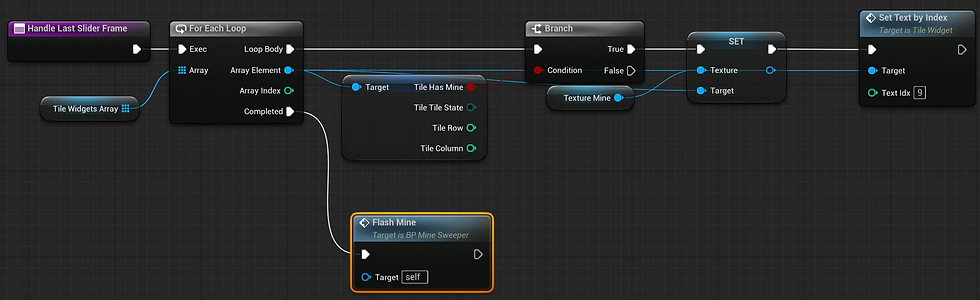
First we find all the tiles that have Mines (this isn’t a part of the History array), so it’s a step that’s appended when the Slider reaches the end. Note we still use the TileStruct to find Tile Has Mine for each tile. Then we call custom event ‘Flash Mine’ which simply loops a delayed ColorOpacity for the last clicked tile to make it turn red then not red every 0.5s so long as bGameOver is true.
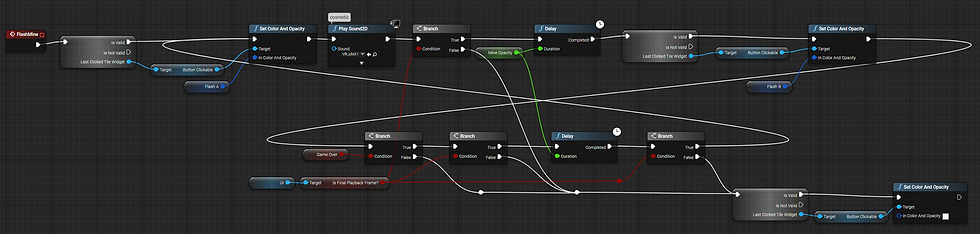
Any loop in blueprints that involves a Delay (latent) has to be pretty safe to opt out of. In this case, if bGameOver isn’t true, or the LastClickedTileWidget is invalid, it just stops. Because there’s a Delay, this is setup in the EventGraph of the actor, not a function.
You might notice that the event is called by HandleLastSliderFrame, which indeed is executed whenever the player drags the slider to the end. Since there’s a looping button flash every .5s potentially already playing, it’s possible to get the event’s ‘Beep’ audio to play twice, with a sort of stutter, if we repeatedly bang the slider to the end a bit too quickly. But this doesn’t really cause any other problem, and the jittery beep sounds like you’ve bumped the slider to the end physically — so while it’s not super elegant, it’s a kind of user feedback win.
The video below shows the affect of glitching the audio on hitting the end of the slider repeatedly.
Once the gameplay works, in that you can complete a playthrough of the game from start to end, it’s surprising how most of the remaining work involves handling exceptional user input, where the player can do things that aren’t expected, but the implementation allows it.
In MinesweeperOnline, for example, players can hold down the cursor and drag over the grid, creating a sort of trailing depressed button. I wasn’t sure if this was intentional or an accidental affect (sometimes a quirk that doesn’t adversely influence gameplay isn’t necessary to remove).
I thought about adding this button-down drag effect ; but it doesn’t contribute to gameplay, so I didn’t want to risk wrecking my efforts.
We’re pretty deep into the woods of minesweeper by now. Since the whole project is available to download for free, there’s no real need to describe every step in granular detail here. It’d be even more verbose than what we’ve glossed over so far. Most of the functions are gathered into very basic steps. Each chunk is more like a thought process than some kind of ideal code ; you would probably arrive at a different expression visually in the blueprint graphs. I did some work on notating and organising the graphs for others to read, but usually when I’m putting graphs together I think about whether I will understand them later. In a team, there’d be workflow standards to follow which might be unique to your team. In the wild, you have more liberty to do what works for you.
Instead of building large blueprint graphs, I try to make several condensed functions that represent the steps you might stickynote on a board when planning the game.

This is the Eventgraph of the main Minesweeper blueprint. Not much to it, right? The takeaway from this image is that the events are all stacked vertically down the left side, and the execution (as much as I can) flows left to right. There’s minimal backwards flow. If you spot some nodes popping up out of line or curling back, it’s probably corrections or optimizations I made right at the end. I actually did this project with a deadline, so it’s not an exemplary blueprint layout. Most of the loops and more complicated looking stuff is where I’ve used latent nodes like a Delay, which have to be in the event graph, and they probably aren’t the most important parts.
Not everything is commented. I tend to comment things that confused me when I set them up, and regular parts with named functions and variables tend to be readable with less clutter. However, it’s hard to know what future me will think of this. But I hope it’s interesting, if not entirely perfect.
Visual Styling
The game has an option to switch the UI styling from image icons to font-based icons. This works at any stage of the game, using an input from Middle Mouse Button event in the Player Controller.
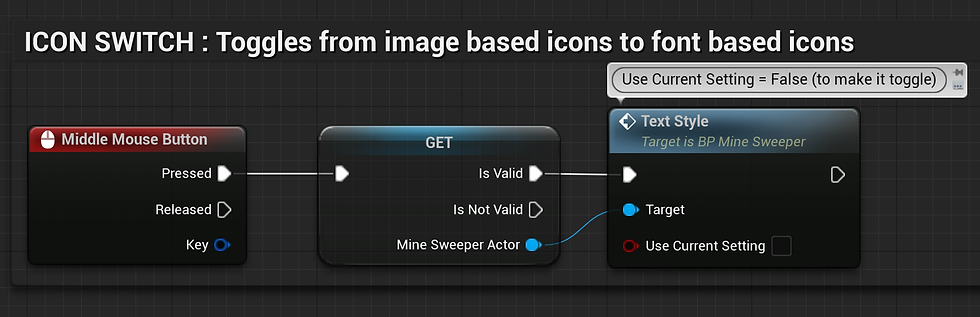
The player controller has a Middle Mouse Button input event that calls ‘TextStyle’ on the MineSweeper actor.
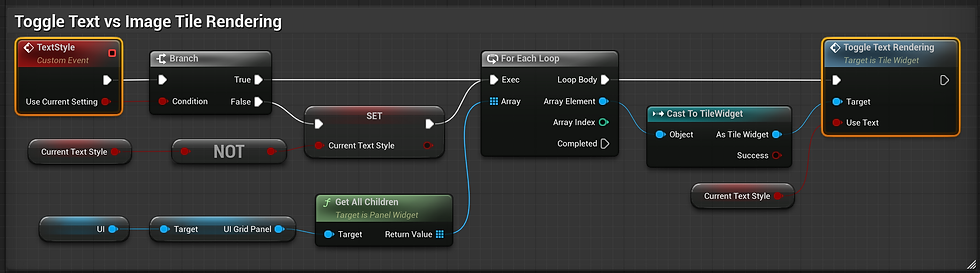
The TextStyle function simply switches between Icon or Font style for every Tile in the grid. Since there are only two types to choose from, we can use a bool. Otherwise, an Enumeration would be best.
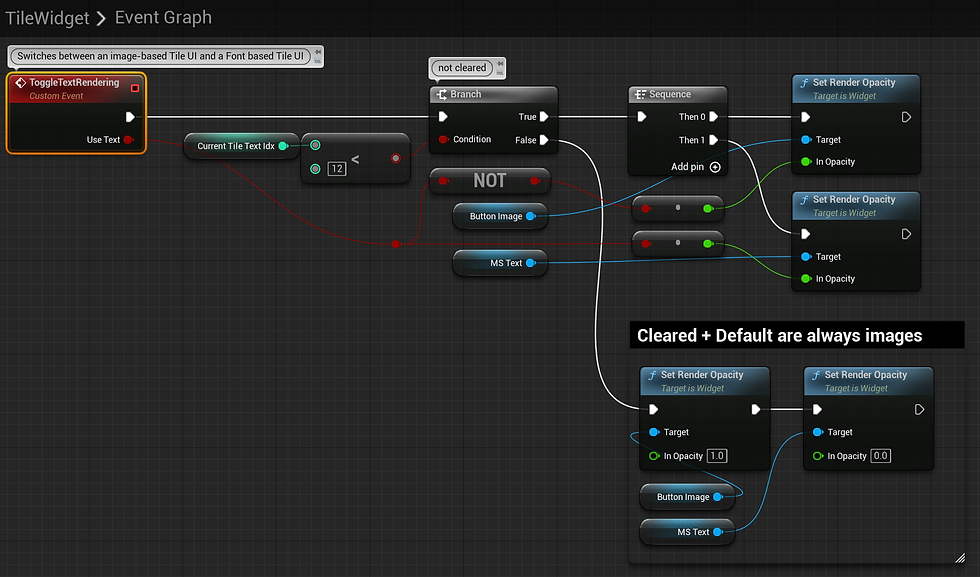
The event to toggle text rendering skips Tiles that are cleared or uncleared, states of a Tile which don’t use a font.
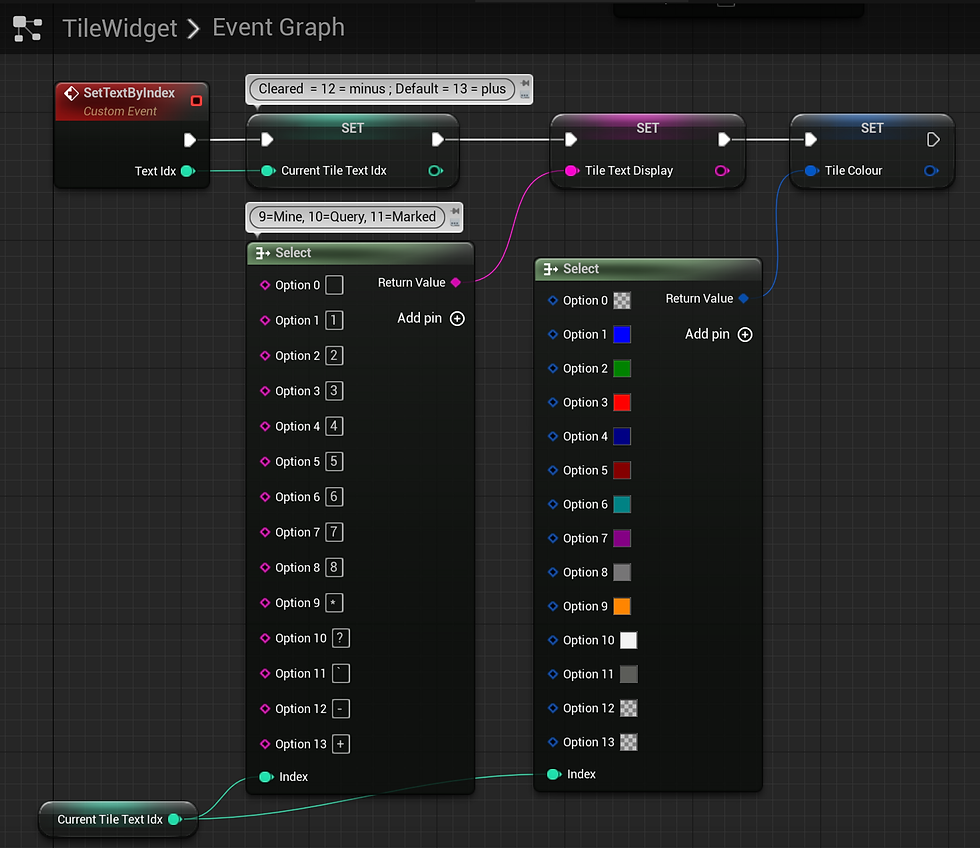
This event in the Tile widget is called on clicking any tile (from the Button clicked event, as tiles are buttons). It sets the font value and colour even when the player is using texture icons for the visual style, so that if they toggle to font-based visual style, everything tile already has the correct values to display.
PROJECT: From the Dropbox link, extract the Zipfile and find the .uproject file, and double click it to open it in Unreal 5.1.x -- you can get Unreal Engine from the Epic Games Launcher (https://store.epicgames.com/en-US/download)
GAME: Extract the Zipfile and run //MinesweeperGame/Windows/Minesweeper.exe.
The zipfiles were made using PeaZip (free) which can also extract them, or you can use Winrar. If you don't want to run an unreliable .exe, you can open the Project and package the Game yourself for Shipping. You may have to tweak some Editor Settings (check the Output Log).
This project is largely unsupported, but if you have comments, hit me up on Twitter @tomofnz


Comments