VR - UI following hand movement
- tomofnz
- Apr 29, 2017
- 2 min read
Not much in setting up VR is easy. Here is a bite sized tutorial on making a hand tracking menu.
I wanted to see how a UI such as the menu for Tilt Brush might be started, so I went looking and found a video 'Mitch's VR Lab, Ep11 : Stereoscopic UI Rendering' which I highly recommend. https://www.youtube.com/watch?v=lxFqUDW5-fE
What that's about is making the UI render into both lenses properly, and he explains the why and how. In short, it's good for clearer text and crisper UI graphics.
You have two elements (a widget and a stereo layer) in the same actor.
A stereo layer component (captures the widget visuals and renders to each lens of the headset).
A widget component (provides the interactivity but no longer needs to render).
That's all you need in your blueprint.
For the stereo layer component, remember to set the Stereo Layer Type to Tracking Locked.
In Mitch's example though, you have the UI placed in the world, which is fine if it's like a door keypad or something, but not great if it's a menu you want to follow your hand. In particular, the example has the problem that only the StereoLayer transform is set, which leaves the Widget behind.
So I spent the afternoon trying to figure out how to bind the actor with its Widget and StereoLayer to the left controller so you can interact with it using the right controller.
In my case, rather than add the blueprint to the world, I made it a child actor in the pawn blueprint. Notice it isn't parented to anything.

For convenience I also added a UIScaleFactor vector variable in the pawn bp to control how big the UI would be, then I modified things like in the pictures below. My widget is just a picture and a slider (which doesn't do anything except slide).
The next bit is necessary in VR so you can simulate clicking on a button without actually using a mouse. You just tell the controller buttons to press Left Mouse Button when used.
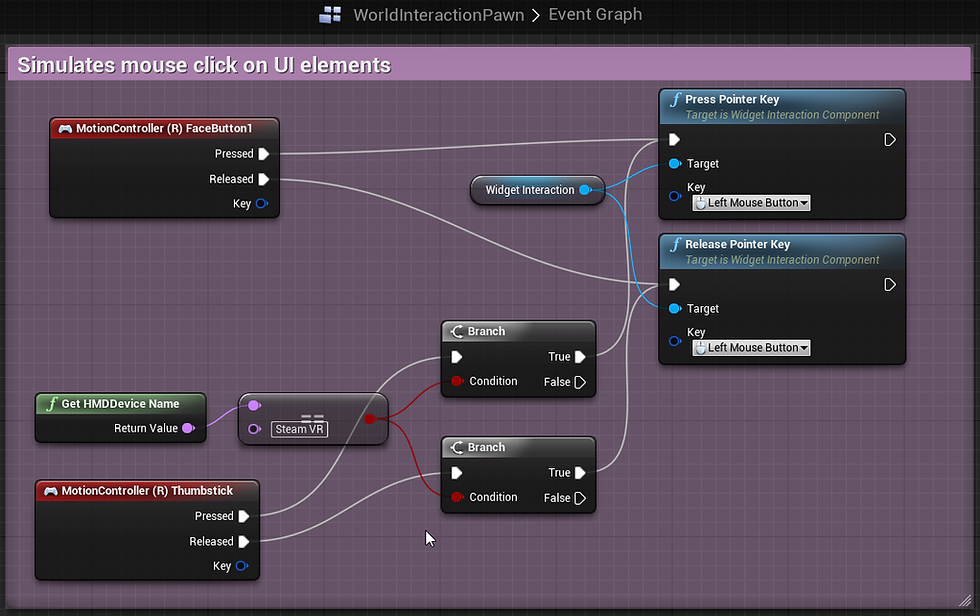
This is the child actor of the pawn which holds the UI.
We want to set the stereo layer to render the widget using a render target, then we want to set the transform for both to match the controller, which is what the collapsed nodes in the last picture handles. Notice the widget also needs to be flipped or it faces the wrong way.

Besides matching the UI to the position of the controller, we can make it always face the player by getting the pawn's Camera component and rotating around its forward vector. There are certainly more sophisticated ways to do all this, but this is super simple and got me where I wanted to be, which is shown in the video.




















Comments